
Composer
Setting up Registrations for your Nord Electro Dual Manual Organ
by Lou Di Falco
posted January 15, 2016Now that you have added a second keyboard to use with your Nord Electro 3 (or previous versions of the Electro), it’s time to discuss the registry settings for jazz playing. By the way, I am sure this stuff can be done with the newer Electro 4 and 5 however not owning one of those keyboards, I am not sure of the setup differences.
What I mean by registrations is the settings of the drawbars. On the NE3 and previous versions as well as all HP Electros, the drawbars are digital representations. Instead of a physical drawbar, there are two buttons below a column of red LEDs. Like the nine drawbars on a tone-wheel organ, there are nine of these columns on the NE3. The lower button is used to “pull out” (LEDs lit) while the upper button is used to “push in” (LEDs off).
The markings on the drawbars refer to feet, feet as in lengths of pipe. Remember that the Hammond Organ was designed as an electronic alternative to a pipe organ. The drawbars were designed to emulate the various lengths of pipes found on the ancestors of modern day organs. The settings from left to right for the nine drawbars are 16’, 5 1/2’, 8’, 4’, 2 2/3’, 2’, 1 3/5’, 1 1/3’ and 1’. The longer the length of pipe, the lower the tone. Foot lengths is how the drawbars are labeled on an actual Hammond Organ. The Nord uses labels on the digital drawbars indicating intervals and they are located just below the LEDs and above the drawbar buttons. See the contrasting images below.
Nord Electro 3 Organ Section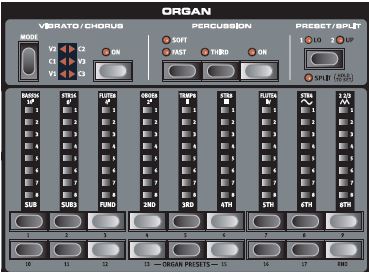
Hammond Drawbars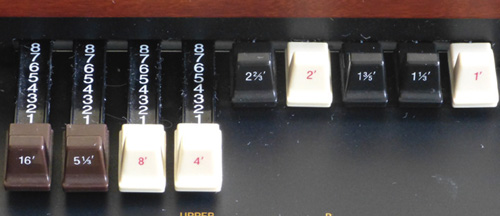
While there are many combinations of drawbar settings, you will be surprised to find that only a handful are used in most jazz settings. First we will focus on the lower manual that gets set once and then is left alone (for the most part). In this article like many other texts that indicate registration settings, I will use numbers to indicate the drawbar settings. For example, (88 8000 000) means the lower three drawbars are pulled all the way out (values can be 0-8) and the top six are off.
Press the Preset/Split button in the organ section so that 1/Lo is selected. Now the digital drawbars in the NE3’s organ section will control the lower keyboard. Pull out the 16’ and 8’ (press the lower drawbar buttons until all LEDs are lit) and leave the other drawbars pushed in (80 8000 000). This is a typical lower manual registration useful for playing left hand base and comping. You can also put out the 5 ˝’ drawbar to value 2 or 3 ( 82 8000 000) to add a bit more meat to the sound. Turn the chorus on and to the C3 setting. The lower manual is pretty much left alone now. While the upper manual will go through many registration changes throughout a tune or set, typically the lower manual never changes. It’s the base sound of the organ, no pun intended. Press the Preset/Split button again to set up the registrations for the top manual – 2/Up. But first, if you want an authentic Hammond experience you should check to make sure the following setting is in place.
Under Sound Menu (Shift-Sound), scroll down to parameter 9, Perc Drawbar 9 Cancel. Change to “C” for cancel. On an original Hammond C3/B3/A100, when the percussion is on, the 9th (right most) drawbar is canceled, in other words, it doesn’t sound. This had to do with the complicated wiring inside the organ as Hammond’s design robbed from a drawbar so the percussion could sound. But it turns out to be another unintended feature much like the key click and crosstalk that was considered anomalies in the original design. Now clone-wheel manufacturers go out of their way to model these “mistakes”. With this setting now set to cancel, we can create and store typical top manual registration.
Pull out the lowest three drawbars to full (88 8000 000). Set percussion to On with the 3rd harmonic (a fifth above the fundamental) and set decay to Fast and Soft. Turn on the chorus and set it to C3. Now the upper manual is set to the classic setting made famous by Jimmy Smith. Now pull out the right most drawbar (88 8800 008). If you changed the Perc Drawbar 9 Cancel setting described above, you should not hear any change in the sound. That’s intended. Turn off percussion and play. Now you will hear the highest drawbar in the mix but with no percussion. This sound is also a very common jazz setting. So now with the touch of a button (percussion on/off) you can toggle between two unique sounds, mimicking the experience of playing a real Hammond tone-wheel organ.
Four sounds are now available without much effort. On the top manual, the classic Jimmy Smith sound with chorus, without chorus, and the percussion off or on. Remember when off, the top drawbar will sound. Then there is the lower manual with its bass/comp setting. Playing only the lower manual is common when backing up other musicians and vocalists while the top manual is used to play melodies and improvisation.
Unfortunately unlike a real Hammond, there are no white on black preset keys on the NE3 (or any Nord product for that matter). However, there are preset buttons underneath the digital drawbars, 18 of them. (However, preset 18 randomly generate the drawbars and are useless for our purpose.)
Any drawbar setting can be stored as one of the 17 other presets. Unfortunately in a playing situation, it is rather clumsy to call them up because it requires two hands. The shift button has to be held while the preset button is pressed. This can be accomplished with one hand if you either have huge hands or your go-to presets are stored in the right most buttons, still a bit clumsy but manageable.
Before changing the drawbars, store the Jimmy Smith sound (88 8000 008) with percussion On in preset button 9. But first, realize these presets are already set to commonly used registrations right from the factory. Compare the factory presets with these registrations. They may already be there. With the Nord Sound manger, you can rearrange the presets very easily, moving them to the right side of the button group for easy access.
Another typical Hammond jazz setting is all drawbars out (known as “shout”, as in “shout chorus” - 88 8888 88) with the rotary speed set to Fast. Create this patch and store it in preset 17. Now with one hand, you can change to this setting by pressing the shift key with your right hand pinky (your left hand will be keeping the bass going) and preset button 17 key with your right thumb or index finger. Now to switch back to the Jimmy Smith setting, you will press preset 9 again. Note that rotary speed is not stored with the patch. It’s a good idea to use a footswitch to toggle between Leslie emulation Chorus and Tremolo.
Another great jazz registration is the Squabble, another setting made famous by Jimmy Smith attempting to emulate the sound of pianist Earl Garner. This setting is achieved with the four right most drawbars along with the single left most drawbar out full (80 0008 888). Store this preset in one of the right most preset buttons, perhaps 8 or 16. Set the rotation effect to fast and you are good to go. Now you have the most common Hammond settings for a jazz situation stored as presets.
One more setting of use is with all drawbars pushed in. What you say? Yep, you heard it right. Of course you need to have percussion set to on with the second harmonic selected. By the way, percussion as with an original Hammond C3/B3/A100 only works with the top manual and is only triggered when playing staccato. In other words, while playing legato you will notice that percussion doesn’t always sound. Each key press cycle must complete before percussion will trigger again.
Playing just percussion is a way to play a piano like passage and is useful when playing pianissimo. Percussion is not very loud but it is effective for quiet moments like at the end of a tune. It’s important to use the 2nd harmonic which is the fundamental. The 3rd harmonic is the 5th and with no drawbars pulled, you will be playing in a key a fifth higher than everyone else.
There you have it. You now have a two manual organ setup emulating the great Hammond Organ with the registrations needed to play jazz. Listen to the greats and glean as much as you can from them. Playing jazz organ is a blast.
Turning Your Older Nord Electro Into a Dual Manual Organ
by Lou Di Falco
posted January 13, 2016One thing that would make the Nord Electro 3 (NE3) better would be to add a second keyboard to act as the lower manual of the organ model. I am predominantly a jazz pianist but I have recently gotten more and more into the great jazz organists. For rock and contemporary music, a single manual clone-wheel is fine. But by studying the great jazz Hammond organist’s technique, it becomes almost a necessity to have that lower manual for base lines and comping. If you own a Nord Electro, there is a very cost effect way of creating a two manual organ experience compared to going out and buying a new two manual clone-wheel.
I purchased an inexpensive 61 note keyboard controller to use as the lower manual with my NE3. And it works great. I’m not providing anything here that is not explained in the NE3 manual. I’m simply attempting to make it easy to setup and understand.
I recommend a 61 note keyboard but there are a couple of requirements. You need one that has the 5 pin MIDI out DIN connector, a USB connector only controller is no good. That’s because the NE3 or its predecessors, unlike the newer Electros, does not receive MIDI note data through the USB port, only system information to upload and download patches. Since both manuals on a vintage Hammond organ have 61 keys each, a 61 note controller is recommended although a 49 note controller could get you by.
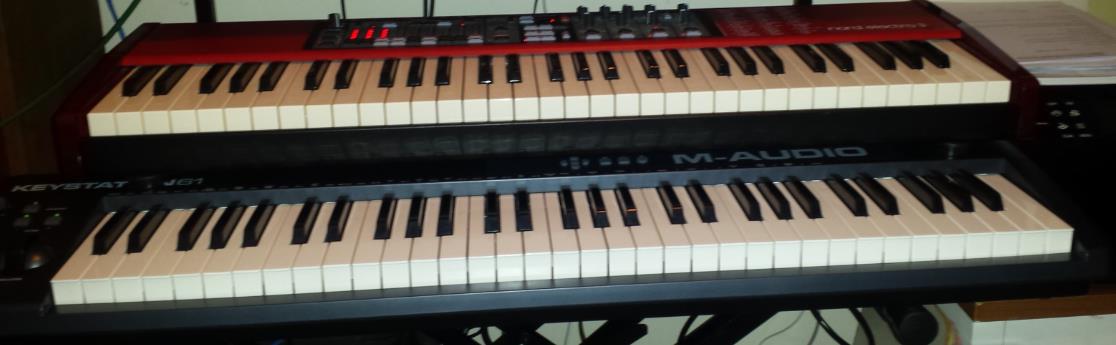
I chose the M-Audio Keystation 61 which is a fairly new controller. It streets for around 170 bucks but you might find even cheaper solutions, like an old keyboards sitting around the house. If it has a MIDI out jack, turn the volume down and you are good to go.
Here are the setup steps:
First, you need to figure out how to physically set up the two keyboards. You might need two keyboard stands or a single stand with some modification. I used a second X style keyboard stand set slightly lower and in front of the X stand supporting the NE3. The below photo shows the physical setup…
Next, connect a short MIDI cable from the controller’s MIDI out to the NE3’s MIDI in port. Then use a standard USB cable (the kind you would get with a printer) to connect the Keystation’s USB port to a power supply (one of these came with the Keystation). You may need to get a USB power converter that plugs into your wall outlet, like the type that comes with your cell-phone. (For most controllers you can buy a DC adapter but that’s a more expensive option than powering through USB and I am attempting to keep this cheap.)
Next, you need to dive into the MIDI and Sound menus on the NE3 to make the appropriate parameter settings. The information to do this is in the Nord Electro 3 manual on pages 12 and 18 but I will cover the steps here as well. Start by going into the MIDI menu (Shift – MIDI).
By default, within the NE3’s settings, the MIDI channel for receiving data from the second manual, in this case the controller keyboard is set to channel 2. This value can be found in MIDI edit mode, parameter 2 - the Lower Channel Setting. Therefore, the controller’s transmit channel must match whatever this value is set to. Unless you have some specific need to use channel 2 for something else, leave it set and change your controller’s transmit channel to 2. MIDI edit mode’s parameter 1 on the NE3 is the Upper Channel Setting and by default it is set to channel 1. But it can be set to any channel as long as it does NOT match the Lower Channel Setting, Just leave it set to 1. So in a nut shell, Upper Channel Setting should be 1 and Lower Channel Setting should be 2.
Next scroll down to MIDI option 6 in the NE3 menu, the MIDI Split option and set it to Yes. Once this option is set to Yes, the NE3’s keyboard will only play the top organ manual. You will not be able to split the NE3’s keyboard and that’s what you want because the controller will handle the organ’s lower manual now.
If all was done correctly, the lower manual should play the NE3. Now you can set up your two manual tone-wheel organ the way it typically is done in a jazz setting. Press the Preset/Split button in the organ section so that 1/Lo is selected. Now the digital drawbars in the NE3’s organ section will determine the sound of the lower keyboard. Select Preset/Split again then the digital drawbars affect the upper manual.
In the next post I will discuss typical Hammond organ registrations (settings) for both manuals.
Older Posts